<property> <description>The class to use as the resource scheduler.</description> <name>yarn.resourcemanager.scheduler.class</name> <value>org.apache.hadoop.yarn.server.resourcemanager.scheduler.capacity.CapacityScheduler</value> </property>
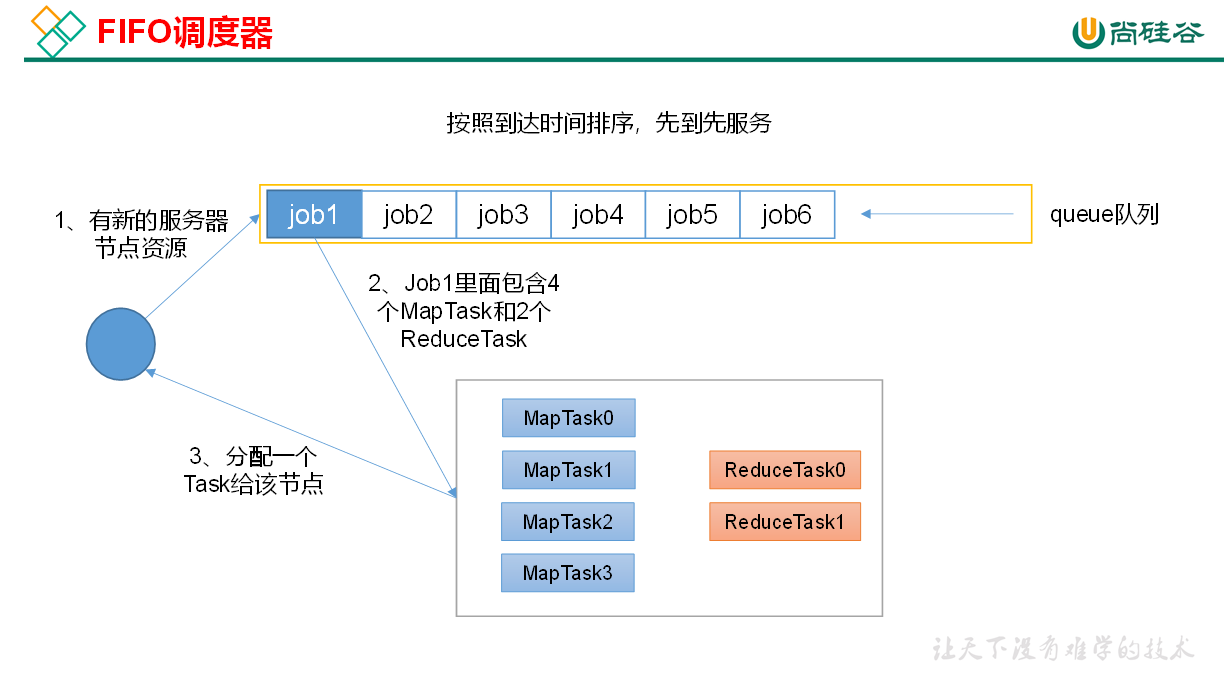
1.4.1 先进先出调度器(FIFO)
FIFO调度器(First In First Out):单队列,根据提交作业的先后顺序,先来先服务。
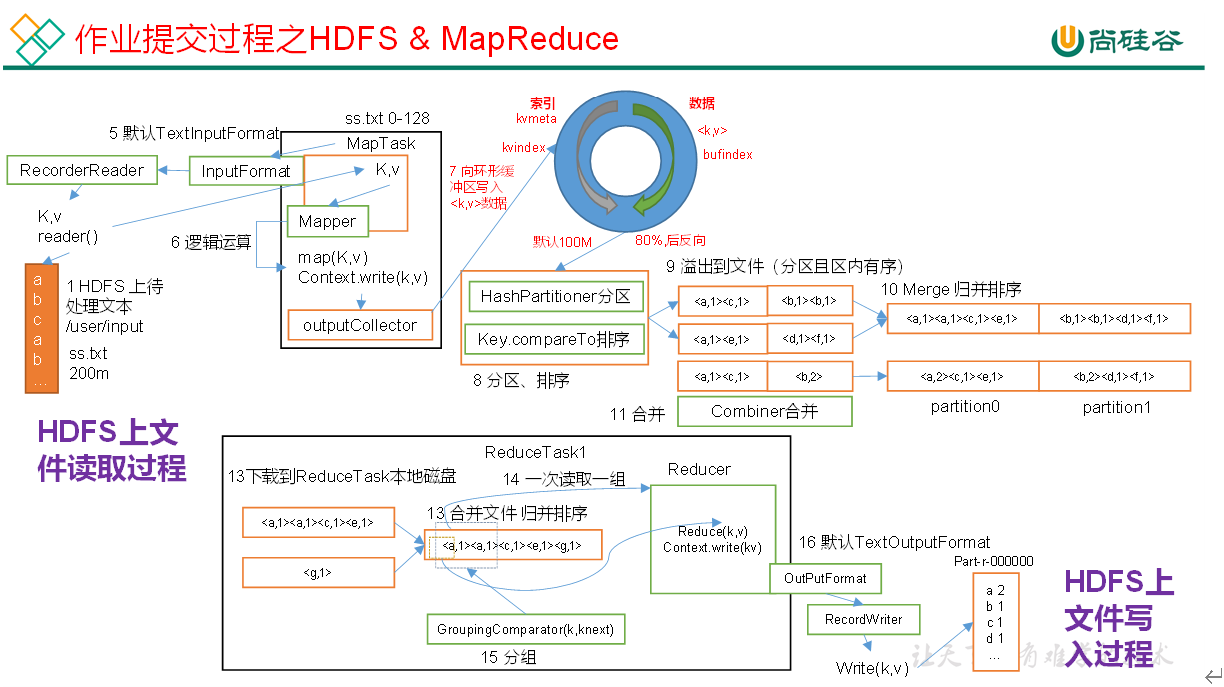
[atguigu@hadoop102 hadoop-3.1.3]$ hadoop jar share/hadoop/mapreduce/hadoop-mapreduce-examples-3.1.3.jar wordcount /input /output
1.5.1 yarn application查看任务
(1)列出所有Application:
1
2
3
4
5
[atguigu@hadoop102 hadoop-3.1.3]$ yarn application -list 2021-02-06 10:21:19,238 INFO client.RMProxy: Connecting to ResourceManager at hadoop103/192.168.10.103:8032 Total number of applications (application-types: [], states: [SUBMITTED, ACCEPTED, RUNNING] and tags: []):0 Application-Id Application-Name Application-Type User Queue State Final-State Progress Tracking-URL
[atguigu@hadoop102 hadoop-3.1.3]$ yarn application -list -appStates FINISHED 2021-02-06 10:22:20,029 INFO client.RMProxy: Connecting to ResourceManager at hadoop103/192.168.10.103:8032 Total number of applications (application-types: [], states: [FINISHED] and tags: []):1 Application-Id Application-Name Application-Type User Queue State Final-State Progress Tracking-URL application_1612577921195_0001 word count MAPREDUCE atguigu default FINISHED SUCCEEDED 100% http://hadoop102:19888/jobhistory/job/job_1612577921195_0001
(3)Kill掉Application:
1
2
3
[atguigu@hadoop102 hadoop-3.1.3]$ yarn application -kill application_1612577921195_0001 2021-02-06 10:23:48,530 INFO client.RMProxy: Connecting to ResourceManager at hadoop103/192.168.10.103:8032 Application application_1612577921195_0001 has already finished
[atguigu@hadoop102 hadoop-3.1.3]$ yarn applicationattempt -list application_1612577921195_0001 2021-02-06 10:26:54,195 INFO client.RMProxy: Connecting to ResourceManager at hadoop103/192.168.10.103:8032 Total number of application attempts :1 ApplicationAttempt-Id State AM-Container-Id Tracking-URL appattempt_1612577921195_0001_000001 FINISHED container_1612577921195_0001_01_000001 http://hadoop103:8088/proxy/application_1612577921195_0001/
[atguigu@hadoop102 hadoop-3.1.3]$ yarn applicationattempt -status appattempt_1612577921195_0001_000001 2021-02-06 10:27:55,896 INFO client.RMProxy: Connecting to ResourceManager at hadoop103/192.168.10.103:8032 Application Attempt Report : ApplicationAttempt-Id : appattempt_1612577921195_0001_000001 State : FINISHED AMContainer : container_1612577921195_0001_01_000001 Tracking-URL : http://hadoop103:8088/proxy/application_1612577921195_0001/ RPC Port : 34756 AM Host : hadoop104 Diagnostics :
1.5.4 yarn container查看容器
(1)列出所有Container:yarn container -list
1 2 3 4
[atguigu@hadoop102 hadoop-3.1.3]$ yarn container -list appattempt_1612577921195_0001_000001 2021-02-06 10:28:41,396 INFO client.RMProxy: Connecting to ResourceManager at hadoop103/192.168.10.103:8032 Total number of containers :0 Container-Id Start Time Finish Time State Host Node Http Address
(2)打印Container状态: yarn container -status
1 2 3
[atguigu@hadoop102 hadoop-3.1.3]$ yarn container -status container_1612577921195_0001_01_000001 2021-02-06 10:29:58,554 INFO client.RMProxy: Connecting to ResourceManager at hadoop103/192.168.10.103:8032 Container with id 'container_1612577921195_0001_01_000001' doesn't exist in RM or Timeline Server.
注:只有在任务跑的途中才能看到container的状态
1.5.5 yarn node查看节点状态
列出所有节点:yarn node -list -all
1 2 3 4 5 6 7
[atguigu@hadoop102 hadoop-3.1.3]$ yarn node -list -all 2021-02-06 10:31:36,962 INFO client.RMProxy: Connecting to ResourceManager at hadoop103/192.168.10.103:8032 Total Nodes:3 Node-Id Node-State Node-Http-Address Number-of-Running-Containers hadoop103:38168 RUNNING hadoop103:8042 0 hadoop102:42012 RUNNING hadoop102:8042 0 hadoop104:39702 RUNNING hadoop104:8042 0
1.5.6 yarn rmadmin更新配置
加载队列配置:yarn rmadmin -refreshQueues
1 2
[atguigu@hadoop102 hadoop-3.1.3]$ yarn rmadmin -refreshQueues 2021-02-06 10:32:03,331 INFO client.RMProxy: Connecting to ResourceManager at hadoop103/192.168.10.103:8033
1.5.7 yarn queue查看队列
打印队列信息:yarn queue -status
1 2 3 4 5 6 7 8 9 10 11 12
[atguigu@hadoop102 hadoop-3.1.3]$ yarn queue -status default
2021-02-06 10:32:33,403 INFO client.RMProxy: Connecting to ResourceManager at hadoop103/192.168.10.103:8032
Queue Information :
Queue Name : default
	State : RUNNING
	Capacity : 100.0%
	Current Capacity : .0%
	Maximum Capacity : 100.0%
	Default Node Label expression : <DEFAULT_PARTITION>
	Accessible Node Labels : *
	Preemption : disabled
	Intra-queue Preemption : disabled
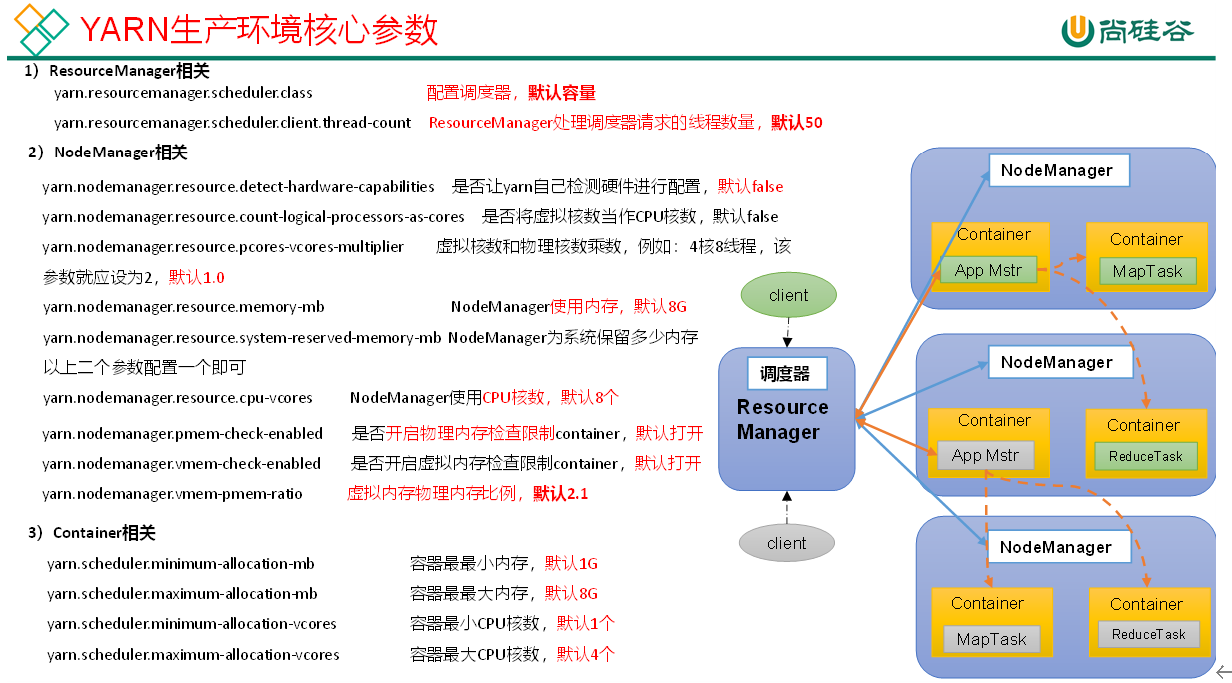
<!-- 选择调度器,默认容量 --> <property> <description>The class to use as the resource scheduler.</description> <name>yarn.resourcemanager.scheduler.class</name> <value>org.apache.hadoop.yarn.server.resourcemanager.scheduler.capacity.CapacityScheduler</value> </property>
<!-- ResourceManager处理调度器请求的线程数量,默认50;如果提交的任务数大于50,可以增加该值,但是不能超过3台 * 4线程 = 12线程(去除其他应用程序实际不能超过8) --> <property> <description>Number of threads to handle scheduler interface.</description> <name>yarn.resourcemanager.scheduler.client.thread-count</name> <value>8</value> </property>
<!-- 是否让yarn自动检测硬件进行配置,默认是false,如果该节点有很多其他应用程序,建议手动配置。如果该节点没有其他应用程序,可以采用自动 --> <property> <description>Enable auto-detection of node capabilities such as memory and CPU. </description> <name>yarn.nodemanager.resource.detect-hardware-capabilities</name> <value>false</value> </property>
<!-- 是否将虚拟核数当作CPU核数,默认是false,采用物理CPU核数 --> <property> <description>Flag to determine if logical processors(such as hyperthreads) should be counted as cores. Only applicable on Linux when yarn.nodemanager.resource.cpu-vcores is set to -1 and yarn.nodemanager.resource.detect-hardware-capabilities is true. </description> <name>yarn.nodemanager.resource.count-logical-processors-as-cores</name> <value>false</value> </property>
<!-- 虚拟核数和物理核数乘数,默认是1.0 --> <property> <description>Multiplier to determine how to convert phyiscal cores to vcores. This value is used if yarn.nodemanager.resource.cpu-vcores is set to -1(which implies auto-calculate vcores) and yarn.nodemanager.resource.detect-hardware-capabilities is set to true. The number of vcores will be calculated as number of CPUs * multiplier. </description> <name>yarn.nodemanager.resource.pcores-vcores-multiplier</name> <value>1.0</value> </property>
<!-- NodeManager使用内存数,默认8G,修改为4G内存 --> <property> <description>Amount of physical memory, in MB, that can be allocated for containers. If set to -1 and yarn.nodemanager.resource.detect-hardware-capabilities is true, it is automatically calculated(in case of Windows and Linux). In other cases, the default is 8192MB. </description> <name>yarn.nodemanager.resource.memory-mb</name> <value>4096</value> </property>
<!-- nodemanager的CPU核数,不按照硬件环境自动设定时默认是8个,修改为4个 --> <property> <description>Number of vcores that can be allocated for containers. This is used by the RM scheduler when allocating resources for containers. This is not used to limit the number of CPUs used by YARN containers. If it is set to -1 and yarn.nodemanager.resource.detect-hardware-capabilities is true, it is automatically determined from the hardware in case of Windows and Linux. In other cases, number of vcores is 8 by default.</description> <name>yarn.nodemanager.resource.cpu-vcores</name> <value>4</value> </property>
<!-- 容器最小内存,默认1G --> <property> <description>The minimum allocation for every container request at the RM in MBs. Memory requests lower than this will be set to the value of this property. Additionally, a node manager that is configured to have less memory than this value will be shut down by the resource manager. </description> <name>yarn.scheduler.minimum-allocation-mb</name> <value>1024</value> </property>
<!-- 容器最大内存,默认8G,修改为2G --> <property> <description>The maximum allocation for every container request at the RM in MBs. Memory requests higher than this will throw an InvalidResourceRequestException. </description> <name>yarn.scheduler.maximum-allocation-mb</name> <value>2048</value> </property>
<!-- 容器最小CPU核数,默认1个 --> <property> <description>The minimum allocation for every container request at the RM in terms of virtual CPU cores. Requests lower than this will be set to the value of this property. Additionally, a node manager that is configured to have fewer virtual cores than this value will be shut down by the resource manager. </description> <name>yarn.scheduler.minimum-allocation-vcores</name> <value>1</value> </property>
<!-- 容器最大CPU核数,默认4个,修改为2个 --> <property> <description>The maximum allocation for every container request at the RM in terms of virtual CPU cores. Requests higher than this will throw an InvalidResourceRequestException.</description> <name>yarn.scheduler.maximum-allocation-vcores</name> <value>2</value> </property>
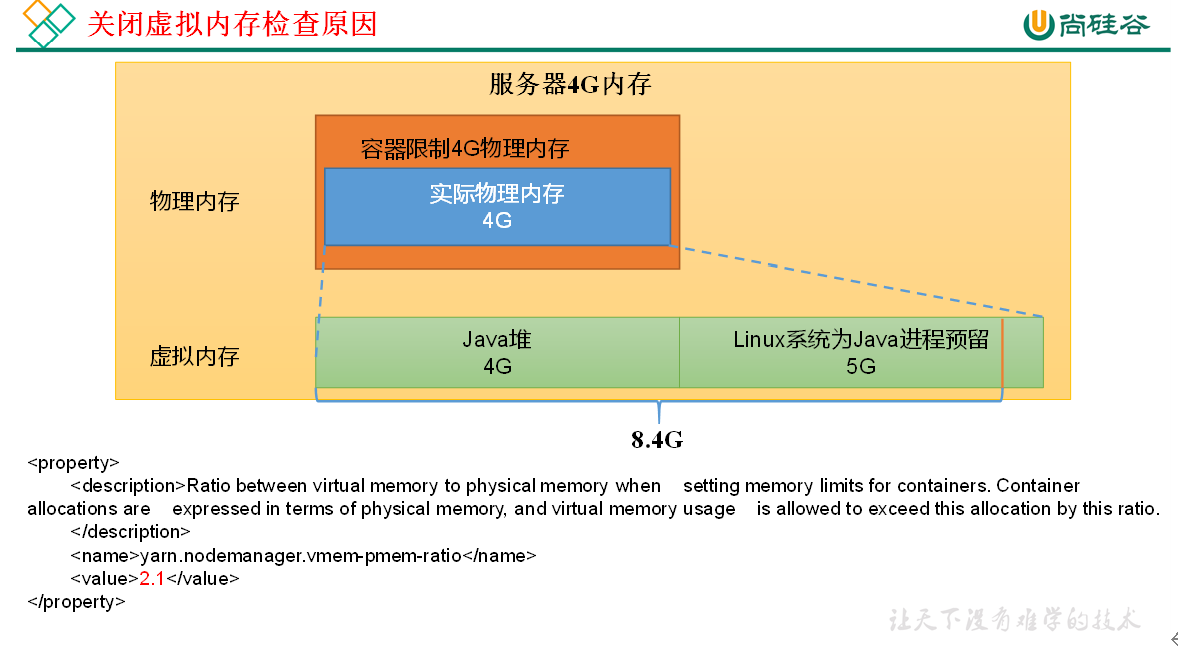
<!-- 虚拟内存检查,默认打开,修改为关闭 --> <property> <description>Whether virtual memory limits will be enforced for containers.</description> <name>yarn.nodemanager.vmem-check-enabled</name> <value>false</value> </property>
<!-- 虚拟内存和物理内存设置比例,默认2.1 --> <property> <description>Ratio between virtual memory to physical memory when setting memory limits for containers. Container allocations are expressed in terms of physical memory, and virtual memory usage is allowed to exceed this allocation by this ratio. </description> <name>yarn.nodemanager.vmem-pmem-ratio</name> <value>2.1</value> </property>
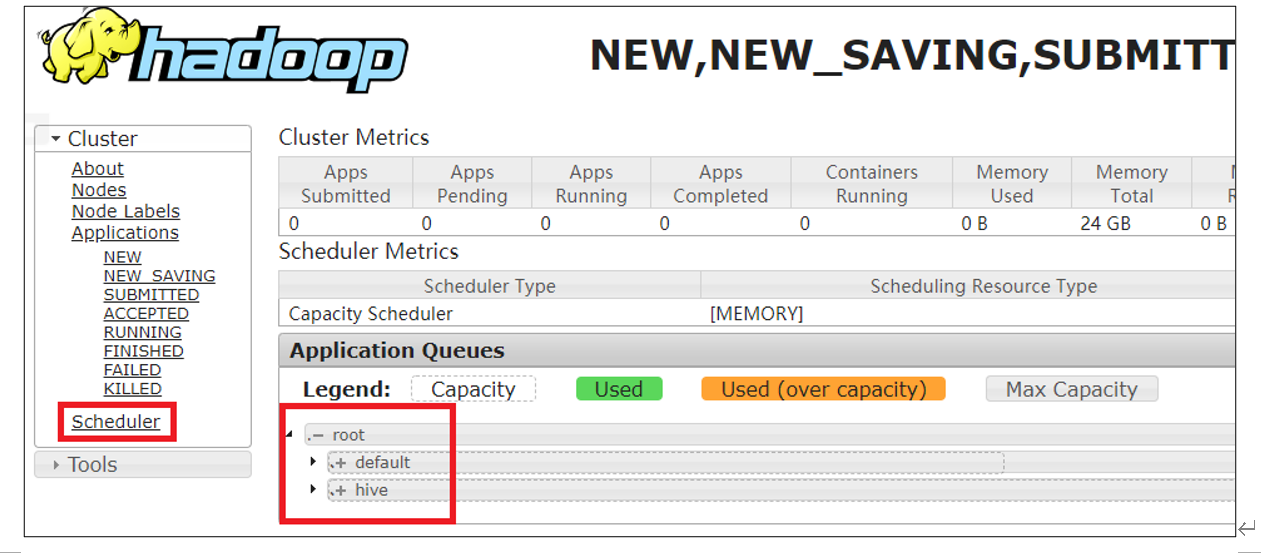
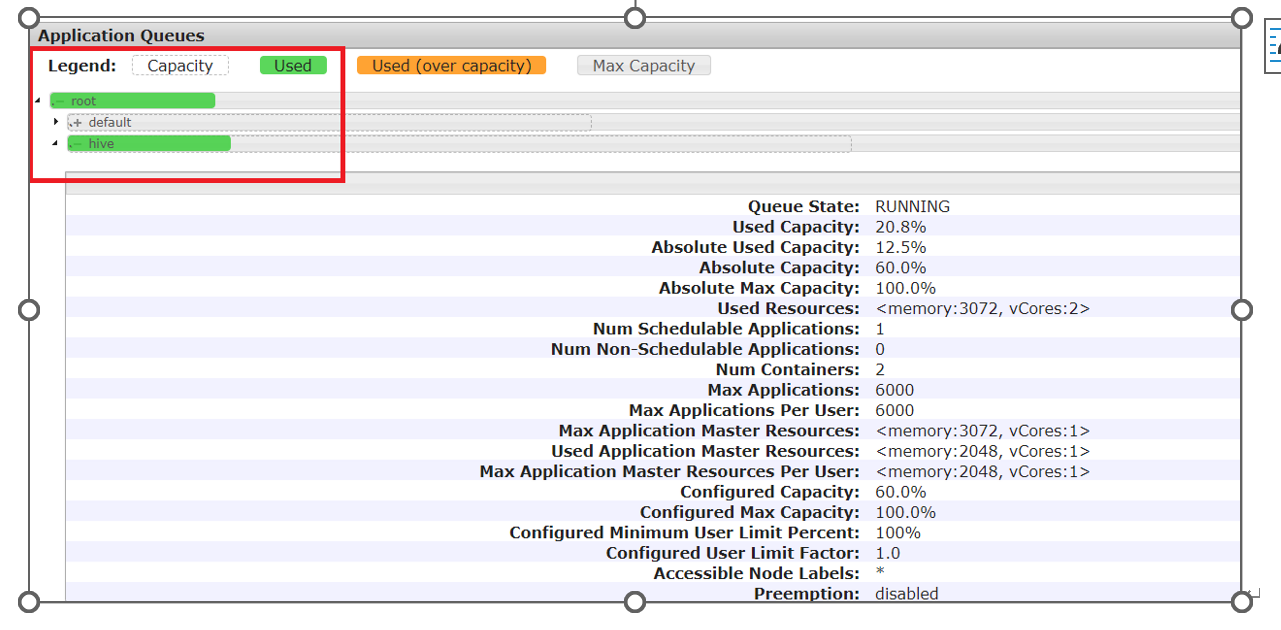
<!-- 指定多队列,增加hive队列 --> <property> <name>yarn.scheduler.capacity.root.queues</name> <value>default,hive</value> <description> The queues at the this level (root is the root queue). </description> </property>
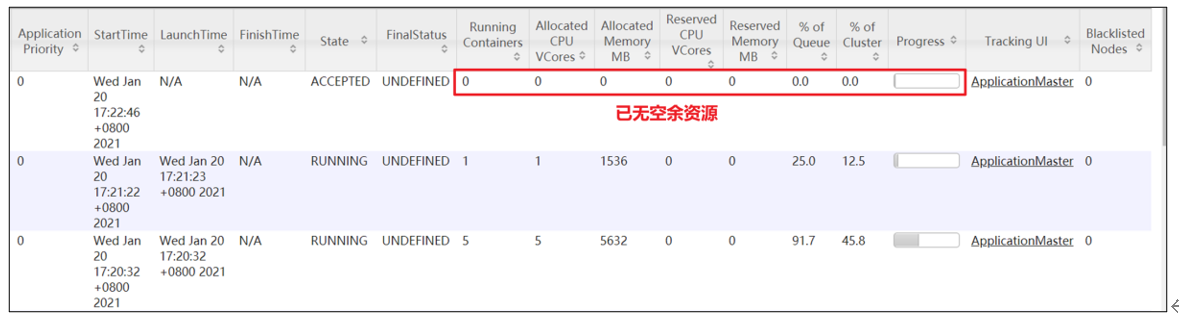
[atguigu@hadoop102 hadoop-3.1.3]$ hadoop jar /opt/module/hadoop-3.1.3/share/hadoop/mapreduce/hadoop-mapreduce-examples-3.1.3.jar pi 5 2000000
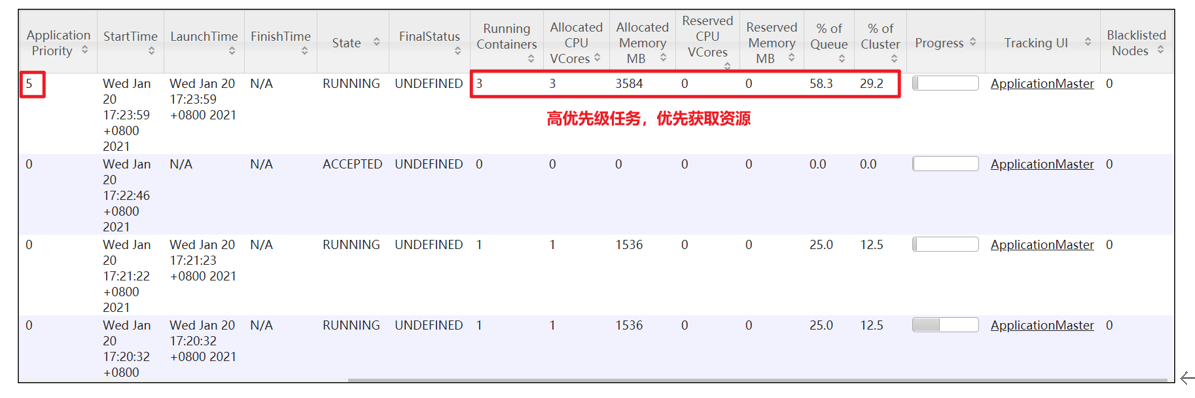
4)再次重新提交优先级高的任务
1
[atguigu@hadoop102 hadoop-3.1.3]$ hadoop jar /opt/module/hadoop-3.1.3/share/hadoop/mapreduce/hadoop-mapreduce-examples-3.1.3.jar pi -D mapreduce.job.priority=5 5 2000000
[atguigu@hadoop102 hadoop-3.1.3]$ hadoop jar /opt/module/hadoop-3.1.3/share/hadoop/mapreduce/hadoop-mapreduce-examples-3.1.3.jar pi -Dmapreduce.job.queuename=root.test 1 1
2)提交任务时不指定队列,按照配置规则,任务会到root.atguigu.atguigu队列
1
[atguigu@hadoop102 hadoop-3.1.3]$ hadoop jar /opt/module/hadoop-3.1.3/share/hadoop/mapreduce/hadoop-mapreduce-examples-3.1.3.jar pi 1 1
2.4 Yarn的Tool接口案例
0)回顾:
1
[atguigu@hadoop102 hadoop-3.1.3]$ hadoop jar wc.jar com.atguigu.mapreduce.wordcount2.WordCountDriver /input /output1
期望可以动态传参,结果报错,误认为是第一个输入参数。
1
[atguigu@hadoop102 hadoop-3.1.3]$ hadoop jar wc.jar com.atguigu.mapreduce.wordcount2.WordCountDriver -Dmapreduce.job.queuename=root.test /input /output1